
How to Preserve Wood:
Complete Guide 1. Sanding
Published on: August 15, 2025
Reading time: 10 minutes

Hi there! Whether you’re lounging under a beach umbrella or gearing up to head into the workshop, what you’re about to read will be incredibly useful. Today we’re talking about how to preserve wood… and not in a quick, shortcut kind of way—this is a full-on XXL guide, Whittled Lovelies style! 😎
It’s so packed with information that I had to split it into three chapters—it’ll keep you company all the way until October. 😱 And once you’ve read them all, you’ll have a go-to reference you can consult anytime you need it, a bit like my sharpening guide—the one I know many of you keep just a click away at all times.
Below, you’ll find the guide’s menu: click on the title or the “+” to open it, then pick the section you want to read. Once the final chapter is online, you’ll be able to hop from one topic to another—and from one article to the next—in no time. Handy, right?
If you love working with wood as much as I do, you already know how rewarding it is to create something with your own hands. But there’s one small-yet-big detail we often tend to overlook: our creations don’t stay beautiful forever. Or rather, not without a little help from us.
Because wood is alive. It breathes, changes, absorbs, and moves. If we don’t treat it properly, it can deteriorate quickly. And I’m pretty sure you wouldn’t want to see a sculpture or a spoon—crafted with patience and passion—crack, fade, or warp after just a few months. It’s happened to me… and trust me, it hurts.
Now, protecting wood can mean many things: stains, oils, waxes, varnishes… but also simply choosing to leave it “natural.” Some projects I leave without any protective finish—my comfort bird, for example—to showcase the material exactly as it is. Others, I treat with care.
The decision isn’t just about what to apply, but begins with how we prepare the surface. And that brings us to the very first step of any well-executed treatment: sanding.
Whether you decide to protect it or leave it natural, sanding — or choosing not to sand — has a huge impact on the look, feel, and longevity of your work.
There are projects, like traditional whittling (the art of knife carving) or Flat Plane carvings, that don’t require sanding at all… (but can still benefit from a good protective finish). Others, on the other hand, are cases where sanding truly makes all the difference.
That’s why we’re starting our guide right here: understanding when to sand, when to skip it, and how to do it in the best possible way to get the perfect base—ready for whatever finish you choose…
Perfect Finishes Start with Good Sanding
You’ll soon realize that sanding well isn’t just “running a bit of sandpaper over it”—it’s the very first, concrete step in turning a rough piece into a finished work ready to last over time.
Safety: From Your Lungs to Your Hands
A good job is also a safe job. Always remember that sanding produces a lot of wood dust, and it’s a silent enemy: breathing it in is never a good idea, regardless of the species. Even “harmless” varieties can cause respiratory issues if inhaled over long periods, while some tropical or highly resinous species can trigger allergies or skin irritation after just a few exposures. (read here the article on wood toxicity)
That’s why I recommend always wearing an FFP2 or FFP3 filtering mask. If you really don’t have one, you can use a simple but fairly effective trick: place a fan behind you so the dust is blown away from your face instead of hanging in the air.
Beyond protecting your airways, think about your hands too: good sanding removes splinters and sharp edges that could scratch or injure—not just you while working, but also whoever will be using the object every day.
Why Sanding Really Makes a Difference
Sanding is the step that defines the final quality of your work. With each pass, the fibers settle, surfaces become even, and cut marks or small imperfections disappear. It’s a change you can already see with the naked eye, but one that truly reveals itself to the touch—the wood becomes smoother, more harmonious, and ready to welcome whatever comes next.
When the surface is carefully prepared, it behaves predictably: it absorbs oils, waxes, or varnishes evenly, resulting in a uniform finish with no blotches or patchy areas. This means the treatment penetrates better, improving both the look and the longevity of the protection.
There’s also a practical advantage: sanded wood is easier to maintain. Dust and dirt have fewer places to cling to, making cleaning quicker. And if you ever want to refresh the finish, just a few light passes will bring it back to optimal condition.
Hand or Power?
- Hand sanding is the safest choice when you’re working on delicate surfaces, intricate details, or artistic carvings. It gives you complete control—you can feel the resistance of the wood, notice every tiny imperfection, and decide in the moment how much pressure to apply. It’s also a very “intimate” experience with the piece: you get close to every curve, respecting shapes and proportions without risking unwanted changes. This is the method I prefer for small objects, sculptures, and projects that demand patience and careful attention.
- Between fully hand sanding and using professional machines, there’s also a middle ground: compact tools like a Dremel fitted with sanding drums or discs. They’re faster than hand sanding and far more agile than a traditional sander, making them ideal for small surfaces, curved areas, or spots that are hard to reach. With these tools, you can combine precision and speed—especially when working on irregular areas without removing too much material.
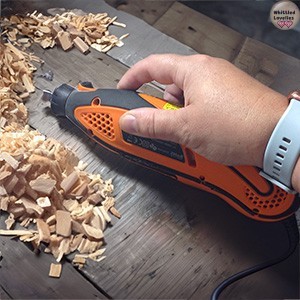
Mini Drill
- When you’re faced with large surfaces—a shelf, a table, or a cabinet door—power sanding becomes almost essential. Orbital, random orbital, or belt sanders: each has its own personality, but they all share one thing—speed. Used correctly, they deliver uniform results and drastically cut down working time. Used hastily or with too much pressure, though, they can cause real damage: visible swirl marks, gouged areas, or spots where more material has been removed than intended. That’s why, even with machines, you need the same care and respect you’d have when working by hand—let the abrasive do its job, without forcing it.
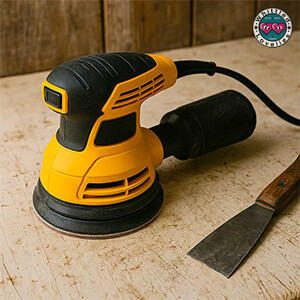

Whether you go for hand sanding or power tools, the rule is the same: the right abrasive matters more than anything—and choosing it well means you’re already halfway there!
Sandpaper: How to Choose the Right Grit
First, make sure it’s made for wood (metal sandpaper has a different structure and performance), and check the number printed on the back: that’s the grit, which measures the sheet’s “roughness.” Low numbers = aggressive sanding, high numbers = fine touch.
- Coarser grits, from 60 to 120, are perfect for heavy stock removal: stripping old finishes, leveling uneven spots, or cleaning up a very rough surface. This is the kind of sandpaper I’d use, for example, to bring an old outdoor tabletop back to life—its strength lies in removing material quickly, but that’s also why it should be used carefully, as it can take off a lot in no time.
- The mid-range, 150–220, is the most versatile. It evens out the surface and preps it for finishing. If I’m not sure where to start, I almost always begin here: gentle enough not to damage the piece, yet capable of fixing small flaws. It works well for many indoor projects—shelves, furniture, kitchen utensils… This grit is already enough to give a pleasant, uniform look. The 180 is my “wild card”—I often use it on its own for quick, light sanding.
- Fine grits, from 240 to 800, are where true finishing begins. At this stage, it’s no longer about fixing—it’s about enhancing. For a cutting board or a wooden spoon, for example, I’ll go up to 400 or even 600: the result is a silky-smooth surface that’s easy to clean and a pleasure to hold. On carvings, I use fine grits to gently caress the details without compromising them. The 320 is often my ideal compromise when I want a velvety finish without going overboard on sanding steps.

Mix Sandpapers
In short, choose your grit based on the condition of the wood and the type of project—start coarser if you need to “clean up,” then work your way up gradually. You don’t have to hit every single number (no need for 120, 150, 180, 220, 240, 320…), but you do need to step up in stages, because jumping too far will leave marks that show.
Secrets for Perfect Sanding
Before you even start, take a moment to look closely at the wood. Check for raised knots, small cracks, glue residue, or old finishes—silent enemies that can ruin your abrasive or leave permanent marks. If you find stubborn spots, it’s better to remove them with a scraper or paint stripper rather than trying to overpower them with a coarse grit.
When you begin sanding for real, don’t rush. Follow the grain of the wood for the first pass, then—before changing to a finer grit—make a very light pass diagonally, and finally go back to following the grain. This little trick removes those invisible micro-scratches that, under a glossy finish, suddenly become all too visible.
For surfaces you want to feel silky-smooth, there’s one extra step that can make a difference: raising the grain. After sanding with a medium grit, wipe the surface with a slightly damp cloth. The water will lift the finest fibers; once it’s dry, a pass with a fine grit will remove them for good—so even if the wood gets wet in the future, you won’t feel those tiny rough spots.
And when you think you’re done, don’t trust direct light alone: tilt the piece and look at it under raking light—the kind that reveals hidden marks and dips. Then close your eyes and let your sense of touch guide you: your hands are the toughest judge, and they’ll tell you right away if the sanding is truly perfect.
So… once the sanding is done, what’s next?
How to Clean Wood After Sanding
Once you’ve finished sanding, it’s easy to think the piece is ready for its finish… but there’s still one important step left. Even if it looks clean, the surface is coated with an ultra-fine dust that settles deep into the fibers and can interfere with how oils, waxes, or varnishes adhere. Many people skip this stage in a rush—only to end up with blotches, streaks, or finishes that peel away far too soon.
Start by removing the most obvious dust. A vacuum cleaner with a soft-bristle nozzle is perfect for reaching every corner without scratching, while a gentle blast of compressed air is ideal for tricky spots or carved areas. At this stage, the goal is to remove the coarse residue without pushing it deeper into the wood.
Then comes the finishing touch: wipe the entire surface with a slightly damp cloth. You’re not trying to soak the wood—just moisten it enough to catch the finest particles. This simple step has a double benefit: it cleans and slightly compacts the fibers, preparing the wood to accept the finish evenly. For those who love precision, there are also woodworking-specific tack cloths—antistatic and reusable—that help avoid leaving behind lint.
A thorough cleaning is the bridge between preparation and the final treatment. This is the moment when your piece, finally free from every trace of dust, is truly ready!
Common Questions and Problems About Sanding
Before moving on to finishes, let’s take a quick pause to answer some of the questions I’m most often asked about sanding. If the question that’s been on your mind isn’t here… don’t worry: send it to me, and I’ll gladly add it—so this section can grow and become even more useful!
When Is It Better Not to Sand?
As I said at the start, it all depends on the style of the project. Sanding isn’t always useful—or advisable. There are times when it’s better to skip it entirely or approach it with extreme care.
For example, on vintage or rustic surfaces, the beauty lies in the patina, the small imperfections, and the marks left by time. Over-aggressive sanding can erase exactly what makes the piece unique. In these cases, I stick to a light cleaning with a soft brush or a non-abrasive sponge—just enough to remove dirt without stripping away the character.
Another case involves very delicate work: intricate carvings full of detail or surfaces already protected by thin finishes such as shellac or natural waxes. Here, traditional sandpaper—especially in lower grits—is too aggressive: it only takes a moment to round off a point, lose a profile, or damage the protective layer. In these situations, I prefer to use extra-fine steel wool (0000) or very gentle abrasive pads, which adapt to the shape without attacking it and allow for safe touch-ups between coats.
In most of my whittling projects, I don’t sand at all: I leave the piece exactly as it is, with the knife marks clearly visible. For me, that too is a kind of beauty.
Do I Always Have to Treat Wood After Sanding?
The short answer is: no, it’s not mandatory. It all depends on the type of object and how it will be used.
If it’s an indoor decoration, an artistic piece, or a small sculpture meant to be displayed without being handled much, you can leave it sanded but unfinished. Over time, it will naturally change color and develop a patina that—in some cases—adds charm. It’s a bit like letting it live and age without outside interference.
If, on the other hand, the object will be used often—a table, a shelf, a bathroom cabinet, a cutting board, or outdoor furniture—it’s best to protect it. A good finish, whether oil, wax, or varnish, creates a barrier against moisture, stains, wear, and marks left by handling. This way, the sanding you’ve done will remain effective for longer, and the piece will keep both its beauty and its functionality over time.
What Changes in the Structure of Wood After Sanding?
From the inside, sanding doesn’t change the nature of the wood—the core and deep fibers remain exactly as they were. The transformation happens on the surface.
With sanding, you remove small imperfections, micro-cracks, and irregularities that could, over time, turn into real problems. Moisture, for example, can more easily work its way in through an untreated crack or porous spot, leading to warping, mold, or stains. A well-prepared surface, on the other hand, is more compact and better able to resist external factors.
How to Safely Sand Kitchen Utensils or Food-Contact Items?
When working on cutting boards, spoons, spatulas, or any object that will come into direct contact with food, you need to take extra care—both for safety and for the longevity of the piece.
The first rule is simple but essential: always use clean, brand-new sandpaper. Avoid reusing sheets from other projects, as they may contain traces of varnish, non-food-safe oils, or potentially harmful dust.
As for grit, go at least up to 320—and even better, 400 or 600. A very smooth surface reduces micro-cracks and raised fibers where dirt or residue could lodge, and it also makes daily cleaning easier.
And after sanding? You’ve got two options:
You can leave the wood unfinished, but make sure to wash and dry it thoroughly after every use. This is a valid option, but only for very hard and durable woods.
Or you can protect it with products certified as food-safe—something we’ll go into in detail in the next chapter dedicated to finishes.
Well, now that you’ve refined the art of sanding, you’ve got a whole month ahead to practice on your pieces: half-finished carvings, sculptures waiting to be smoothed, spoons dreaming of becoming silky to the touch…
So, what are you waiting for? Grab the right sandpaper, put on your mask (yes, that pesky dust again!), and enjoy this time of “creative training.” I’ll see you back here next month: I’ll bring the finishes, you bring the sanded wood! Deal? 😂 Byeee! 🤗
This is an article written by a human for humans!
All articles in the blog are written by me. No contributors, no people paid to write content for me.
Posts written by guests or friends of the blog are marked under the title with the words “guest post.” These are friendly collaborations, contributions to the carving community.
No AI (artificial intelligence) support is employed in the writing of blog articles, and all content is made with the intent to please humans, not search engines.
Do you like my content?
Maybe you can consider a donation in support of the blog!

Click on the link Ko-fi to access a secure payment method and confidently offer me coffee or whatever you want!
From time to time, in my articles, you’ll find underlined words or buttons with the 🛒 symbol. These are links that lead to further insights, or affiliate links to selected products that I use or would personally choose for the same kind of project I’m talking about.
The price for you stays the same, but by purchasing through these links you help me grow the blog and keep sharing the world of wood in a free and independent way. 💛